PREAMBLE
Introduction
I am not the first to write a guide on Falloff; that honour goes to Zewy in his Forum Guide from September 2013 where he provided a well constructed cursory glance at various weapons.
The work provided here should be taken as an elaboration of this earlier work, where data has been retested, sorted, harmonized, and reconstructed as percentages from base damage -- accurate to within 1 damage. These new numbers should provide a suitable launching point for investigation, inquiry, and theory-crafting.
This data was collected over about two and a half weeks between June/July 2014.
This guide follows the following format:
PREAMBLE
- Introduction
- What is Falloff?
- Why Aren't the Curves Curved?
- Gun Selection Criteria
- A Note on Weapon Skill
GUN INDEX
- Legend
- Pistols
- Assault Rifles
- Light Machine Guns
- Sub Machine Guns
- Combat Shotguns
- Pump Shotguns
- Sawed-Off Shotguns
BREAKDOWNS
TECHNICAL DETAILS & ERRATA
APPENDICIES
What is Falloff?
Falloff is a property of some bullet guns (as opposed to Explosive, Exotic, or Cold Fire weapons). There is a set range at which these bullet guns output 100% of their base damage. After this range (called here the "Falloff Range"), the damage the guns outputs decreases as the range to the target increases (typically falling off in a curve, called here the "Falloff Curve").
Both the Falloff Range as well as the shape of the Falloff Curve varies by gun.
+Falloff mods and Stalker Synergy affect the Falloff Range; Stalker Synergy also seems to extend the Falloff Curve.
Why Aren't the Curves Curved?
The curves are not displayed as actual curves, because they are not actually curves. While the curve of a VOT Pulser, for example, could be generally described by the quadratic curve [-0.0516135 x^2+0.222329 x+100.016], testing reveals that Trion has used linear equations to approximate curve shapes. This could be for code optimization or ease of adjustment for balancing purposes; either way, the curves used in the live game are angular approximations.
Back to Top
Gun Selection Criteria
The gun selection in this guide reflects all guns available from Vendor Lockboxes (Tier II - Tier IV), narrowed down to gun types which have +Falloff gun mods and +Falloff skill bonuses. Simply -- Pistols, Automatic weapons, and Shotguns. 72 guns were tested, with data sets being collected for 54 of them.
Unfortunately, data collection from weapons which had multiple-pellet scatter-shots exhibited two problems: (a) they couldn't hit my ideal test target (a turret); and (b) while testing on other stationary objects (eg. hellbug eggs, explosive crates) they seemed to exhibit characteristics similar to explosive blast radii -- that is to say, while standing stationary at point blank range (0 m), the gun damage was inconsistent. These guns have thus been left out of this analysis, but are listed in the gun index for thorough disclosure.
Otherwise, the remaining data should reflect a fairly thorough cross-section of bullet guns in the game. DLC bullet guns should generally reflect the base models (eg. the VBI EEC HP-7 Wildcat, although untested, likely shares the falloff characteristics of its base model, the VBI HP-6 Wolfhound).
There may be other unique guns with specific falloff properties, but I didn't attempt to look for them.
Back to Top
A Note on Weapon Skill
All testing was done with maxed weapon skills.
Back to Top
GUN INDEX
Legend
For the purposes of this guide, ranges are described as follows:
Point Blank: 0 m - 10 m (with 0 m - 3 m being denoted as red on the graphs, representing "on top of" the target, and 4 m - 10 m being denoted as orange, representing "really bloody close".)
Close Range: 10 m - 20 m
Mid Range: 20 m - 40 m
Far Range: 40 m - 60 m
Extreme Range: 60 m+ (draw distance is around 80 m)
Optimal Range: the range in which the gun will output 80% or more damage
Natural Falloff Range: the distance after which the Falloff Curve begins
80% Range: the range at which the gun outputs 80% damage
Max Range: the range at which the Falloff Curve ends (usually this is percentage at draw except in the case of the VBI PS-30 Slugger, where the max range represents the point after which the reticle turns white and the target cannot be hit).
Back to Top
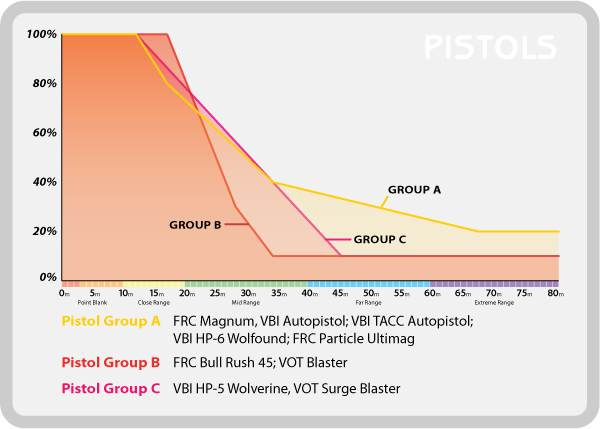
Pistols
| Model | Optimal Range | Natural Falloff Range | 80% Range | Max Range |
| FRC Bull Rush 45 | Close Range | 17 m | 20 m | 10% @ 34 m |
| FRC Northstar Flare | Extreme Range | inf. | n/a | n/a |
| FRC Magnum | Close Range | 12 m | 17 m | 20% @ 67 m |
| FRC Particle Ultimag* | Close Range | 12 m | 17 m | 20% @ 67 m |
| VBI Autopistol | Close Range | 12 m | 17 m | 20% @ 67 m |
| VBI TACC Autopistol | Close Range | 12 m | 17 m | 20% @ 67 m |
| VBI PA-12 Haar | unavailable | unavailable | unavailable | unavailable |
| VBI HP-5 Wolverine | Close Range | 12 m | 19 m | 10% @ 46 m |
| VBI HP-6 Wolfhound | Close Range | 12 m | 17 m | 20% @ 67 m |
| VOT Blaster | Close Range | 17 m | 20 m | 10% @ 34 m |
| VOT Surge Blaster* | Close Range | 12 m | 19 m | 10% @ 46 m |
| Unarmed | Close Range | 12 m | 17 m | 20% @ 67 m |
| Trick'd Out | Close Range | 12 m | 17 m | 20% @ 67 m |
*The FRC Particle Ultimag and VOT Surge Blaster exhibit damage consstency at full charge.
Back to Top
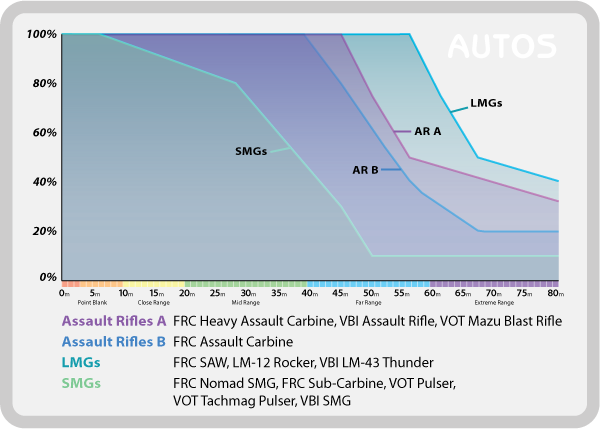
Assault Rifles
| Model | Optimal Range | Natural Falloff Range | 80% Range | Max Range |
| FRC Assault Carbine | Mid Range | 39 m | 45 m | 20% @ 67 m |
| FRC Heavy Assault Carbine | Mid Range | 45 m | 49 m | ~30% @ draw |
| VBI Assault Rifle | Mid Range | 45 m | 49 m | ~30% @ draw |
| VBI TACC Assault Rifle | Extreme Range | inf. | n/a | n/a |
| VOT Blast Rifle | unavailable | unavailable | unavailable | unavailable |
| VOT Mazu Blast Rifle | Mid Range | 45 m | 49 m | ~30% @ draw |
Back to Top
Light Machine Guns
| Model | Optimal Range | Natural Falloff Range | 80% Range | Max Range |
| FRC SAW | Far Range | 56 m | 60 m | ~40% @ draw |
| VBI LM-12 Rocker | Far Range | 56 m | 60 m | ~40% @ draw |
| VBI LM-43 Thunder | Far Range | 56 m | 60 m | ~40% @ draw |
| VOT Disruptor | Extreme Range* | inf. | n/a | n/a |
*The VOT Disruptor exhibits the data collection problems associated with multi-pellet shotguns (namely, it won't hit the target turret), but was tested near draw distances against chickens at Iron Demon Ranch and no falloff was noted.
Back to Top
Sub Machine Guns
| Model | Optimal Range | Natural Falloff Range | 80% Range | Max Range |
| FRC Nomad SMG | Close Range | 6 m | 28 m | 10% @ 50 m |
| FRC Sub-Carbine | Close Range | 6 m | 28 m | 10% @ 50 m |
| VOT Pulser | Close Range | 6 m | 28 m | 10% @ 50 m |
| VOT Tachmag Pulser | Close Range | 6 m | 28 m | 10% @ 50 m |
| VBI SMG | Close Range | 6 m | 28 m | 10% @ 50 m |
Back to Top
Combat Shotguns
| Model | Optimal Range | Natural Falloff Range | 80% Range | Max Range |
| FRC Auto-Scattergun | Close Range | 6 m | 12 m | 25% @ 28 m* |
| FRC Berserker Shotgun | unavailable | unavailable | unavailable | unavailable |
| FRC Particle Scattergun | unavailable | unavailable | unavailable | unavailable |
| VBI Auto-Shotgun | unavailable | unavailable | unavailable | unavailable |
| VBI TACC Auto-Shotgun | unavailable | unavailable | unavailable | unavailable |
| VBI CS-X Cluster Shot | Extreme Range | inf. | n/a | n/a |
| VBI PAS-24 Tornado | unavailable | unavailable | unavailable | unavailable |
| VOT Auto-Fragger | unavailable | unavailable | unavailable | unavailable |
| VOT Surge Nano-Fragger | unavailable | unavailable | unavailable | unavailable |
* To be verified
Back to Top
Pump Shotguns
| Model | Optimal Range | Natural Falloff Range | 80% Range | Max Range |
| FRC Birdshot Pump | unavailable | unavailable | unavailable | unavailable |
| FRC Scattergun | unavailable | unavailable | unavailable | unavailable |
| FRC Heavy Scattergun | unavailable | unavailable | unavailable | unavailable |
| VBI Shotgun | unavailable | unavailable | unavailable | unavailable |
| VBI PS-30 Slugger | Close Range | 12 m | 20 m | 0% @ 33 m |
| VOT Fragger | unavailable | unavailable | unavailable | unavailable |
| VOT Grind Fragger | unavailable | unavailable | unavailable | unavailable |
Back to Top
Sawed-Off Shotguns
| Model | Optimal Range | Natural Falloff Range | 80% Range | Max Range |
| FRC Sawed-Off Scattergun | unavailable | unavailable | unavailable | unavailable |
| FRC Heavy Sawed-Off Scattergun | Point Blank | 3 m | 4 m | 10% @ 17 m |
| VBI SO-2 Courier | Unlimited | n/a | n/a | n/a |
| VBI Short-Barrel Shotgun | unavailable | unavailable | unavailable | unavailable |
| VOT Nano Fragger | unavailable | unavailable | unavailable | unavailable |
Back to Top
BREAKDOWNS
Analysis and The Problem with Stalker
Alongside the graphs and the data plots, I've also projected out some of the effects of modifications and 2/2 Stalker Synergy.
I have not included data in regards to how crit multiplication modifications measure up against falloff modification as crit percentages are extremely variable and dependant on context (e.g. Scrapper Progenitor versus Hellbug Matron). For quick review, however, Falloff versus Damage modifiers have been posted.
A small amount of data (only a few guns) has been gathered for examining the Stalker Synergy. Certainly more work can be done in a separate, more thorough analysis. 2/2 Stalker adds about 15% distance to each point, which ultimately increases the falloff range, as well as the range of the nodes. It does not appear to have synergy with +falloff mods (subject to verification). Data gathered so far is inconclusive and has been provided as a rough guide only.
Back to Top
Pistols
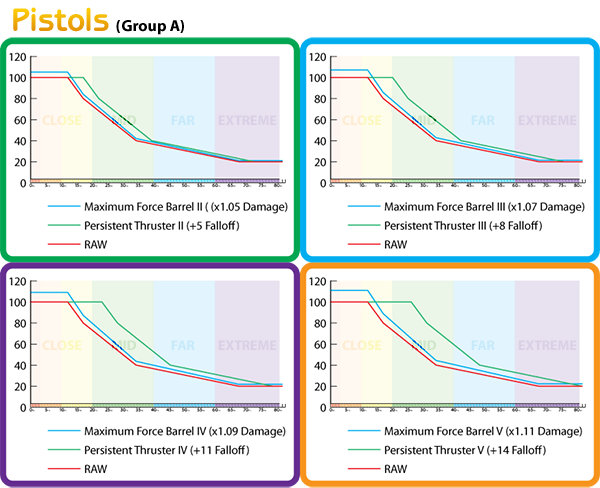
Gun Models:
FRC Magnum, VBI Autopistol, VBI TACC Autopistol, VBI HP-6 Wolfound, FRC Particle Ultimag, Unarmed, Trick'd Out
Natural Falloff Range: 12 m
| Index | Uncommon | Rare | Epic | Legendary |
| Crossover Point (point where Persistent Thruster provides more output than Maximum Force Barrel) | 13 m | 13 m | 14 m | 14 m |
| Crossover Point (with 2/2 Stalker synergy*) | 15 m | 15 m | 16 m | 16 m |
| Optimal Range (with Persistent Thruster) | Close Range | Close Range | Close Range | Mid Range |
| Optimal Range (with Persistent Thruster & 2/2 Stalker*) | Close Range | Close Range | Mid Range | Mid Range |
| Falloff Range (with Persistent Thruster) | 17 m | 20 m | 23 m | 26 m |
| Falloff Range (with Persistent Thruster & 2/2 Stalker*) | 19 m | 22 m | 25 m | 28 m |
| 80% Range (with Persistent Thruster) | 22 m | 25 m | 28 m | 31 m |
| 80% Range (with Persistent Thruster & 2/2 Stalker*) | 25 m | 28 m | 31 m | 34 m |
| Max Range (with Persistent Thruster) | 72 m | 75 m | 78 m | draw |
| Max Range (with Persistent Thruster & 2/2 Stalker*) | draw | draw | draw | draw |
*rough guesstimate
Calculated Curve* (listed in percentages):
100, 100, 100, 100, 100, 100, 100, 100, 100, 100, 100, 100, 100, 96, 92, 88, 84, 80, 77.64, 75.29, 72.94, 70.59, 68.23, 65.88, 63.53, 61.17, 58.82, 56.47, 54.12, 51.76, 49.41, 47.06, 44.7, 42.35, 40, 39.39, 38.79, 38.18, 37.58, 36.97, 36.36, 35.76, 35.15, 34.55, 33.94, 33.33, 32.73, 32.12, 31.52, 30.91, 30.3, 29.7, 29.09, 28.49, 27.88, 27.27, 26.67, 26.06, 25.45, 24.85, 24.24, 23.64, 23.03, 22.42, 21.82, 21.21, 20.61, 20, 20, 20, 20, 20, 20, 20, 20, 20, 20, 20, 20, 20, 20, 20, 20
* accurate to 1 damage
N.B.: the first coordinate is at 0 m.; bolded numbers represent nodes
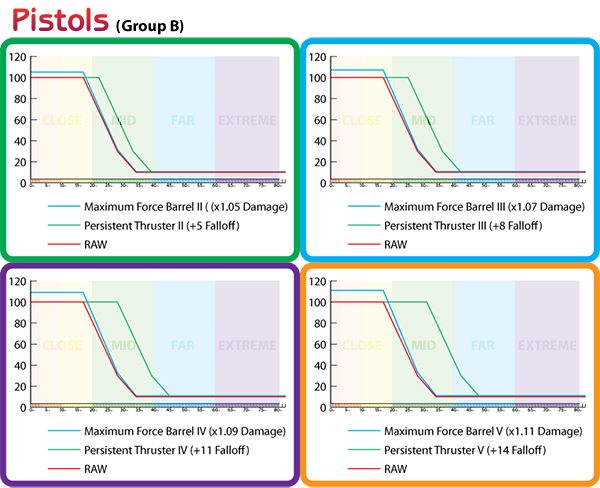
Gun Models:
FRC Bull Rush 45, VOT Blaster
Natural Falloff Range: 17 m
| Index | Uncommon | Rare | Epic | Legendary |
| Crossover Point (point where Persistent Thruster provides more output than Maximum Force Barrel) | 18 m | 19 m | 19 m | 19 m |
| Crossover Point (with 2/2 Stalker synergy*) | 20 m | 21 m | 21 m | 21 m |
| Optimal Range (with Persistent Thruster) | Close Range | Close Range | Close Range | Mid Range |
| Optimal Range (with Persistent Thruster & 2/2 Stalker*) | Close Range | Close Range | Mid Range | Mid Range |
| Falloff Range (with Persistent Thruster) | 22 m | 25 m | 28 m | 31 m |
| Falloff Range (with Persistent Thruster & 2/2 Stalker*) | 24 m | 27 m | 30 m | 32 m |
| 80% Range (with Persistent Thruster) | 25 m | 28 m | 31 m | 34 m |
| 80% Range (with Persistent Thruster & 2/2 Stalker*) | 27 m | 30 m | 34 m | 37 m |
| Max Range (with Persistent Thruster) | 39 m | 42 m | 45 m | 48 m |
| Max Range (with Persistent Thruster & 2/2 Stalker*) | 45 m | 48 m | 51 m | 55 m |
*rough guesstimate
Calculated Curve* (listed in percentages):
100, 100, 100, 100, 100, 100, 100, 100, 100, 100, 100, 100, 100, 100, 100, 100, 100, 100, 93.64, 87.27, 80.91, 74.55, 68.18, 61.82, 55.45, 49.09, 42.73, 36.36, 30, 26.66, 23.33, 20, 16.66, 13.33, 10, 10, 10, 10, 10, 10, 10, 10, 10, 10, 10, 10, 10, 10, 10, 10, 10, 10, 10, 10, 10, 10, 10, 10, 10, 10, 10, 10, 10, 10, 10, 10, 10, 10, 10, 10, 10, 10, 10, 10, 10, 10, 10, 10, 10, 10, 10, 10, 10
* accurate to 1 damage
N.B.: the first coordinate is at 0 m.; bolded numbers represent nodes
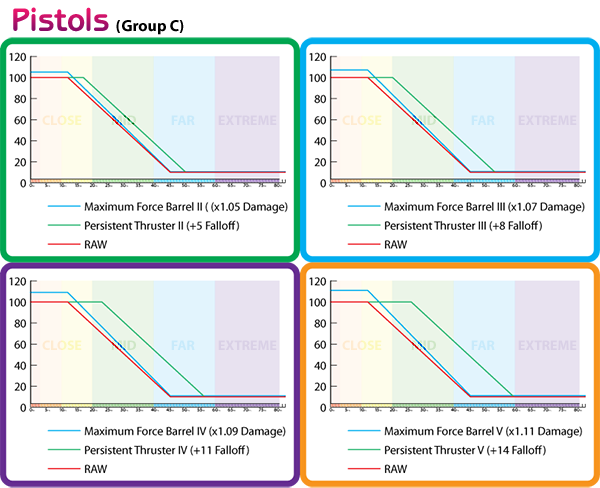
Gun Models:
VBI HP-5 Wolverine, VOT Surge Blaster
Natural Falloff Range: 12 m
| Index | Uncommon | Rare | Epic | Legendary |
| Crossover Point (where Persistent Thruster provides more output than Maximum Force Barrel) | 14 m | 14 m | 15 m | 16 m |
| Crossover Point (with 2/2 Stalker synergy*) | 14 m | 15 m | 16 m | 16 m |
| Optimal Range (with Persistent Thruster) | Close Range | Close Range | Mid Range | Mid Range |
| Optimal Range (with Persistent Thruster & 2/2 Stalker*) | Close Range | Mid Range | Mid Range | Mid Range |
| Falloff Range (with Persistent Thruster) | 17 m | 20 m | 23 m | 26 m |
| Falloff Range (with Persistent Thruster & 2/2 Stalker*) | 19 m | 22 m | 25 m | 28 m |
| 80% Range (with Persistent Thruster) | 24 m | 27 m | 30 m | 33 m |
| 80% Range (with Persistent Thruster & 2/2 Stalker*) | 27 m | 30 m | 31 m | 37 m |
| Max Range (with Persistent Thruster) | 51 m | 54 m | 57 m | 60 m |
| Max Range (with Persistent Thruster & 2/2 Stalker*) | 56 m | 59 m | 62 m | 65 m |
*rough guesstimate
Calculated Curve* (listed in percentages):
100, 100, 100, 100, 100, 100, 100, 100, 100, 100, 100, 100, 100, 97.27, 94.54, 91.81, 89.09, 86.36, 83.63, 80.91, 78.18, 75.45, 72.72, 70, 67.27, 64.54, 61.81, 59.09, 56.36, 53.63, 50.91, 48.18, 45.45, 42.72, 40, 37.27, 34.54, 31.81, 29.09, 26.36, 23.63, 20.91, 18.18, 15.45, 12.72, 10, 10, 10, 10, 10, 10, 10, 10, 10, 10, 10, 10, 10, 10, 10, 10, 10, 10, 10, 10, 10, 10, 10, 10, 10, 10, 10, 10, 10, 10, 10, 10, 10, 10, 10, 10, 10, 10
* accurate to 1 damage
N.B.: the first coordinate is at 0 m.; bolded numbers represent nodes
Back to Top
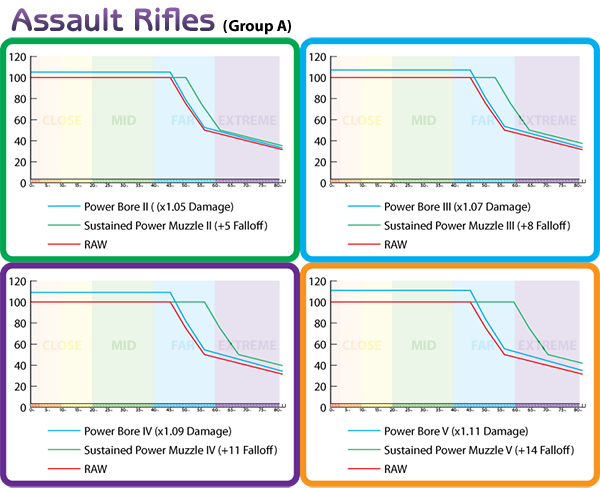
Automatic Weapons
Gun Models:
FRC Heavy Assault Carbine, VBI Assault Rifle, VOT Mazu Blast Rifle
Natural Falloff Range: 45 m
| Index | Uncommon | Rare | Epic | Legendary |
| Crossover Point (where Sustained Power Muzzle provides more output than Power Bore) | 45 m | 46 m | 46 m | 46 m |
| Crossover Point (with 2/2 Stalker synergy*) | 50 m | 51 m | 51 m | 51 m |
| Optimal Range (with Sustained Power Muzzle) | Far Range | Far Range | Far Range | Far Range |
| Optimal Range (with Sustained Power Muzzle & 2/2 Stalker*) | Far Range | Far Range | Extreme Range | Extreme Range |
| Falloff Range (with Sustained Power Muzzle) | 50 m | 53 m | 56 m | 59 m |
| Falloff Range (with Sustained Power Muzzle & 2/2 Stalker*) | 56 m | 59 m | 62 m | 65 m |
| 80% Range (with Sustained Power Muzzle) | 54 m | 57 m | 60 m | 63 m |
| 80% Range (with Sustained Power Muzzle & 2/2 Stalker*) | 61 m | 64 m | 67 m | 70 m |
| Max Range (with Sustained Power Muzzle) | draw | draw | draw | draw |
| Max Range (with Sustained Power Muzzle & 2/2 Stalker*) | draw | draw | draw | draw |
*rough guesstimate
Calculated Curve* (listed in percentages):
100, 100, 100, 100, 100, 100, 100, 100, 100, 100, 100, 100, 100, 100, 100, 100, 100, 100, 100, 100, 100, 100, 100, 100, 100, 100, 100, 100, 100, 100, 100, 100, 100, 100, 100, 100, 100, 100, 100, 100, 100, 100, 100, 100, 100, 100, 95, 90, 85, 80, 75, 70.83, 66.66, 62.5, 58.33, 54.16, 50, 49.26, 48.52, 47.78, 47.04, 46.3, 45.56, 44.82, 44.08, 43.34, 42.6, 41.85, 41.11, 40.37, 39.63, 38.89, 38.15, 37.41, 36.67, 35.93, 35.19, 34.45, 33.71, 32.97, 32.23, 31.48, 30.74, 30
* accurate to 1 damage
N.B.: the first coordinate is at 0 m.; bolded numbers represent nodes

Gun Models:
FRC Assault Carbine
Natural Falloff Range: 39 m
| Index | Uncommon | Rare | Epic | Legendary |
| Crossover Point (where Sustained Power Muzzle provides more output than Power Bore) | 40 m | 40 m | 41 m | 41 m |
| Crossover Point (with 2/2 Stalker synergy*) | 50 m | 51 m | 51 m | 51 m |
| Optimal Range (with Sustained Power Muzzle) | Far Range | Far Range | Far Range | Far Range |
| Optimal Range (with Sustained Power Muzzle & 2/2 Stalker*) | Far Range | Far Range | Far Range | Far Range |
| Falloff Range (with Sustained Power Muzzle) | 44 m | 47 m | 50 m | 53 m |
| Falloff Range (with Sustained Power Muzzle & 2/2 Stalker*) | 47 m | 50 m | 53 m | 56 m |
| 80% Range (with Sustained Power Muzzle) | 50 m | 53 m | 56 m | 59 m |
| 80% Range (with Sustained Power Muzzle & 2/2 Stalker*) | 60 m | 63 m | 66 m | 69 m |
| Max Range (with Sustained Power Muzzle) | 72 m | 75 m | 78 m | draw |
| Max Range (with Sustained Power Muzzle & 2/2 Stalker*) | draw | draw | draw | draw |
*rough guesstimate
Calculated Curve* (listed in percentages):
100, 100, 100, 100, 100, 100, 100, 100, 100, 100, 100, 100, 100, 100, 100, 100, 100, 100, 100, 100, 100, 100, 100, 100, 100, 100, 100, 100, 100, 100, 100, 100, 100, 100, 100, 100, 100, 100, 100, 100, 96.66, 93.33, 90, 86.66, 83.33, 80, 76.36, 72.72, 69.09, 65.45, 61.81, 58.18, 54.54, 50.91, 47.27, 43.63, 40, 38.18, 36.36, 34.54, 32.73, 30.91, 29.09, 27.27, 25.45, 23.63, 21.82, 20, 20, 20, 20, 20, 20, 20, 20, 20, 20, 20, 20, 20, 20, 20, 20
* accurate to 1 damage
N.B.: the first coordinate is at 0 m.; bolded numbers represent nodes
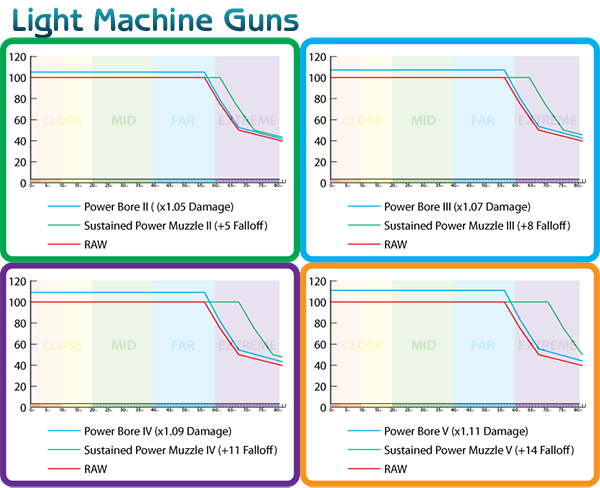
Gun Models:
FRC SAW, LM-12 Rocker, VBI LM-43 Thunder
Natural Falloff Range: 56 m
| Index | Uncommon | Rare | Epic | Legendary |
| Crossover Point (where Sustained Power Muzzle provides more output than Power Bore) | 56 m | 57 m | 57 m | 57 m |
| Crossover Point (with 2/2 Stalker synergy*) | 64 m | 65 m | 65 m | 65 m |
| Optimal Range (with Sustained Power Muzzle) | Far Range | Far Range | Extreme Range | Extreme Range |
| Optimal Range (with Sustained Power Muzzle & 2/2 Stalker*) | Extreme Range | Extreme Range | Extreme Range | Extreme Range |
| Falloff Range (with Sustained Power Muzzle) | 61 m | 64 m | 67 m | 70 m |
| Falloff Range (with Sustained Power Muzzle & 2/2 Stalker*) | 64 m | 67 m | 70 m | 73 m |
| 80% Range (with Sustained Power Muzzle) | 65 m | 68 m | 71 m | 74 m |
| 80% Range (with Sustained Power Muzzle & 2/2 Stalker*) | 74 m | 77 m | draw | draw |
| Max Range (with Sustained Power Muzzle) | draw | draw | draw | draw |
| Max Range (with Sustained Power Muzzle & 2/2 Stalker*) | draw | draw | draw | draw |
*rough guesstimate
Calculated Curve* (listed in percentages):
100, 100, 100, 100, 100, 100, 100, 100, 100, 100, 100, 100, 100, 100, 100, 100, 100, 100, 100, 100, 100, 100, 100, 100, 100, 100, 100, 100, 100, 100, 100, 100, 100, 100, 100, 100, 100, 100, 100, 100, 100, 100, 100, 100, 100, 100, 100, 100, 100, 100, 100, 100, 100, 100, 100, 100, 100, 95, 90, 85, 80, 75, 70.83, 66.66, 62.49, 58.33, 54.16, 49.99, 49.25, 48.5, 47.75, 47.02, 46.28, 45.55, 44.81, 44.07, 43.33, 42.59, 41.85, 41.11, 40.37, 39.63, 38.89
* accurate to 1 damage
N.B.: the first coordinate is at 0 m.; bolded numbers represent nodes
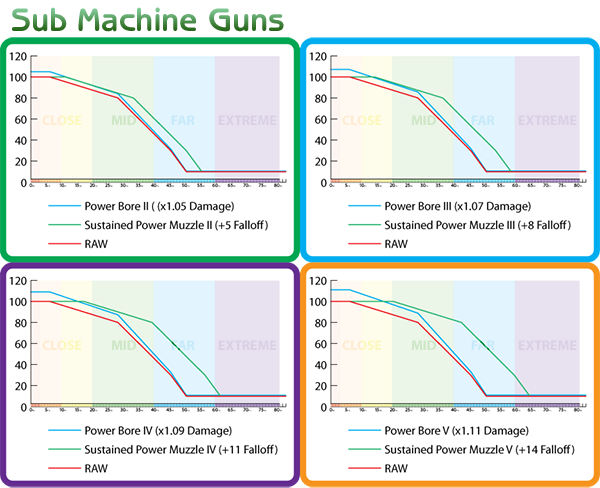
Gun Models:
FRC Nomad SMG, FRC Sub-Carbine, VOT Pulser, VOT Tachmag Pulser, VBI SMG
Natural Falloff Range: 6 m
| Index | Uncommon | Rare | Epic | Legendary |
| Crossover Point (where Sustained Power Muzzle provides more output than Power Bore) | 11 m | 13 m | 15 m | 16 m |
| Crossover Point (with 2/2 Stalker synergy*) | 12 m | 14 m | 16 m | 17 m |
| Optimal Range (with Sustained Power Muzzle) | Mid Range | Mid Range | Mid Range | Mid Range |
| Optimal Range (with Sustained Power Muzzle & 2/2 Stalker*) | Mid Range | Mid Range | Mid Range | Mid Range |
| Falloff Range (with Sustained Power Muzzle) | 11 m | 14 m | 17 m | 20 m |
| Falloff Range (with Sustained Power Muzzle & 2/2 Stalker*) | 12 m | 15 m | 18 m | 21 m |
| 80% Range (with Sustained Power Muzzle) | 33 m | 36 m | 39 m | 72 m |
| 80% Range (with Sustained Power Muzzle & 2/2 Stalker*) | 37 m | 40 m | 43 m | 46 m |
| Max Range (with Sustained Power Muzzle) | 55 m | 58 m | 61 m | 64 m |
| Max Range (with Sustained Power Muzzle & 2/2 Stalker*) | 62 m | 65 m | 68 m | 71 m |
*rough guesstimate
Calculated Curve* (listed in percentages):
100, 100, 100, 100, 100, 100, 100, 99.09, 98.18, 97.27, 96.36, 95.45, 94.55, 93.64, 92.73, 91.82, 90.91, 90, 89.09, 88.18, 87.27, 86.36, 85.45, 84.55, 83.64, 82.73, 81.82, 80.91, 80, 77.06, 74.12, 71.18, 68.24, 65.3, 62.36, 59.42, 56.48, 53.54, 50.6, 47.66, 44.72, 41.78, 38.84, 35.9, 32.96, 30, 26, 22, 18, 14, 10, 10, 10, 10, 10, 10, 10, 10, 10, 10, 10, 10, 10, 10, 10, 10, 10, 10, 10, 10, 10, 10, 10, 10, 10, 10, 10, 10, 10, 10, 10, 10, 10
* accurate to 1 damage
N.B.: the first coordinate is at 0 m.; bolded numbers represent nodes
Back to Top
Select Shotguns
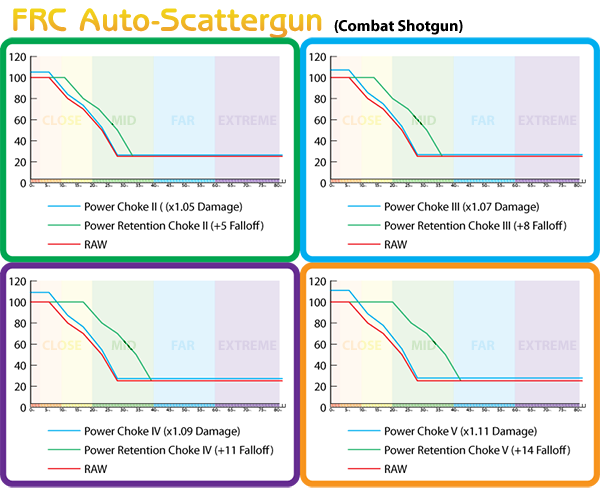
Natural Falloff Range: 6 m
| Index | Uncommon | Rare | Epic | Legendary |
| Crossover Point (where Power Retention Choke provides more output than Power Choke) | 7 m | 7 m | 8 m | 8 m |
| Crossover Point (with 2/2 Stalker synergy*) | 8 m | 8 m | 9 m | 9 m |
| Optimal Range (with Power Retention Choke) | Point Blank | Point Blank | Close Range | Close Range |
| Optimal Range (with Power Retention Choke & 2/2 Stalker*) | Close Range | Close Range | Close Range | Close Range |
| Falloff Range (with Power Retention Choke) | 11 m | 14 m | 17 m | 20 m |
| Falloff Range (with Power Retention Choke & 2/2 Stalker*) | 12 m | 15 m | 18 m | 21 m |
| 80% Range (with Power Retention Choke) | 18 m | 21 m | 24 m | 27 m |
| 80% Range (with Power Retention Choke & 2/2 Stalker*) | 20 m | 23 m | 26 m | 29 m |
| Max Range (with Power Retention Choke) | 33 m | 36 m | 39 m | 42 m |
| Max Range (with Power Retention Choke & 2/2 Stalker*) | 37 m | 40 m | 43 m | 46 m |
*rough guesstimate
Calculated Curve* (listed in percentages):
100, 100, 100, 100, 100, 100, 100, 96.66, 93.33, 90, 86.66, 83.33, 80, 78, 76, 74, 72, 70, 66.67, 63.33, 60, 56.67, 53.33, 50, 45, 40, 35, 30, 25, 25, 25, 25, 25, 25, 25, 25, 25, 25, 25, 25, 25, 25, 25, 25, 25, 25, 25, 25, 25, 25, 25, 25, 25, 25, 25, 25, 25, 25, 25, 25, 25, 25, 25, 25, 25, 25, 25, 25, 25, 25, 25, 25, 25, 25, 25, 25, 25, 25, 25, 25, 25, 25, 25, 25
* accurate to 1 damage
N.B.: the first coordinate is at 0 m.; bolded numbers represent nodes
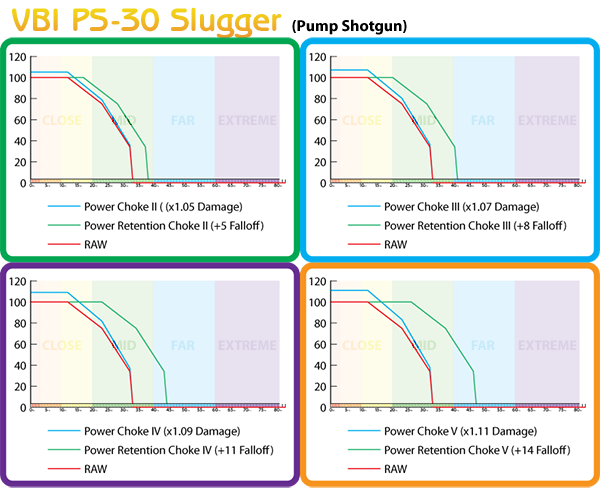
Natural Falloff Range: 12 m
| Index | Uncommon | Rare | Epic | Legendary |
| Crossover Point (where Power Retention Choke provides more output than Power Choke) | 14 m | 14 m | 15 m | 15 m |
| Crossover Point (with 2/2 Stalker synergy*) | 15 m | 15 m | 16 m | 17 m |
| Optimal Range (with Power Retention Choke) | Close Range | Close Range | Mid Range | Mid Range |
| Optimal Range (with Power Retention Choke & 2/2 Stalker*) | Close Range | Mid Range | Mid Range | Mid Range |
| Falloff Range (with Power Retention Choke) | 17 m | 20 m | 23 m | 26 m |
| Falloff Range (with Power Retention Choke & 2/2 Stalker*) | 18 m | 21 m | 24 m | 27 m |
| 80% Range (with Power Retention Choke) | 25 m | 28 m | 31 m | 34 m |
| 80% Range (with Power Retention Choke & 2/2 Stalker*) | 28 m | 31 m | 34 m | 37 m |
| Max Range (with Power Retention Choke) | 38 m | 41 m | 44 m | 47 m |
| Max Range (with Power Retention Choke & 2/2 Stalker*) | 42 m | 45 m | 48 m | 51 m |
*rough guesstimate
Calculated Curve* (listed in percentages):
100, 100, 100, 100, 100, 100, 100, 100, 100, 100, 100, 100, 100, 97.73, 95.45, 93.18, 90.91, 88.63, 86.36, 84.09, 81.82, 79.54, 77.27, 75, 70.46, 65.91, 61.37, 56.82, 52.28, 47.73, 43.19, 38.64, 34.1, 0, 0, 0, 0, 0, 0, 0, 0, 0, 0, 0, 0, 0, 0, 0, 0, 0, 0, 0, 0, 0, 0, 0, 0, 0, 0, 0, 0, 0, 0, 0, 0, 0, 0, 0, 0, 0, 0, 0, 0, 0, 0, 0, 0, 0, 0, 0, 0, 0, 0
* accurate to 1 damage
N.B.: the first coordinate is at 0 m.; bolded numbers represent nodes
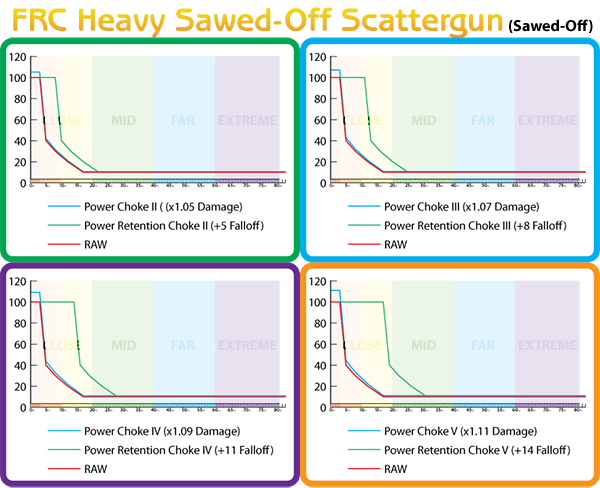
Natural Falloff Range: 3 m
| Index | Uncommon | Rare | Epic | Legendary |
| Crossover Point (where Power Retention Choke provides more output than Power Choke) | 3 m | 3 m | 3 m | 3 m |
| Crossover Point (with 2/2 Stalker synergy*) | 3 m | 3 m | 3 m | 3 m |
| Optimal Range (with Power Retention Choke | Point Blank | Point Blank | Close Range | Close Range |
| Optimal Range (with Power Retention Choke & 2/2 Stalker*) | Point Blank | Point Blank | Close Range | Close Range |
| Falloff Range (with Power Retention Choke) | 8 m | 11 m | 14 m | 17 m |
| Falloff Range (with Power Retention Choke & 2/2 Stalker*) | 8 m | 11 m | 14 m | 17 m |
| 80% Range (with Power Retention Choke) | 9 m | 12 m | 15 m | 18 m |
| 80% Range (with Power Retention Choke & 2/2 Stalker*) | 10 m | 13 m | 16 m | 19 m |
| Max Range (with Power Retention Choke) | 23 m | 26 m | 29 m | 32 m |
| Max Range (with Power Retention Choke & 2/2 Stalker*) | 25 m | 28 m | 31 m | 34 m |
*rough guesstimate
Calculated Curve* (listed in percentages):
100, 100, 100, 100, 70, 40, 36.67, 33.33, 30, 27.5, 25, 22.5, 20, 18, 16, 14, 12, 10, 10, 10, 10, 10, 10, 10, 10, 10, 10, 10, 10, 10, 10, 10, 10, 10, 10, 10, 10, 10, 10, 10, 10, 10, 10, 10, 10, 10, 10, 10, 10, 10, 10, 10, 10, 10, 10, 10, 10, 10, 10, 10, 10, 10, 10, 10, 10, 10, 10, 10, 10, 10, 10, 10, 10, 10, 10, 10, 10, 10, 10, 10, 10, 10, 10
* accurate to 1 damage
N.B.: the first coordinate is at 0 m.; bolded numbers represent nodes
TECHNICAL DETAILS & ERRATA
Project Details:
Workflow Establishment
The first thing needed to measure Falloff Ranges and Curves is an accurate measurement system. It was determined that using the global coordinate system would be a useful measure of distances. However, in order to use the global coordinate system as a measurement system, two things needed to be verified: (a) that the coordinate system uses a square grid; and (b) that gun card ranges could be aligned with it.
In the case of (a), the measurements of a Ziggurat at Seascape farms (closest Last Chance) was measured via the global coordinate system. It was found that this Ziggurat was perfectly aligned to the coordinate grid and measured 36 units by 36 units.
In the case of (b), testing both BMGs and +Falloff mods revealed that the coordinate system and the gun card ranges were the same. The exact calculation used in the early work to determine distances is: SQRT(((ABS([Y Coordinate 2]-[Y Coordinate 1]))^2)+((ABS([X Coordinate 2]-[X Coordinate 1]))^2)).
Unfortunately, there is some rounding problems how the game measures angular distance, but this equation was consistent to +/- 1 unit.
It was later suggested that the unit in question is the meter, as this is used in development files.

It is also the measurement used in the determination of distance-to-target when setting a custom target on the map (i.e. the pink flag shows km or m to it).
The final BMG data was collected into another guide.
Data Collection
The ideal target had a few ideal properties: (a) it was stationary, (b) it had a large range on a singular axis (X or Y) from which to measure distances (due to the rounding issues with angular measurements), and (c) it would hopefully be tucked away from general playing areas.
In the case of (a), my target list was narrowed down to three potential targets: hellbug eggs, explosive crates, and turrets. It was suggested that a deactivated turret would provide the best target as they continue to recieve damage once deactivated.
A hunt for turrets then commenced: all solo maps/arenas were checked first, and when no suitable candidates were found, I started checking the world map.
A perfect turret was ultimately found at the Zhena Array at coordinates [3430, 7474], which satisfied all my conditions. The ruined home beside this turret seems well aligned to the global coordinate grid (allowing a quick visual alignment guide), and the turret has a clear view to around 60m on the y axis, and to draw distance on the x axis while staying on a relatively flat z plane. It was also quiet. In all my hours of testing, I was only interrupted by players a handful of times (they usually surprised me with Bulwarks).
N.B.: If you plan to use this turret for further testing, it is highly recommended that the enemies at the turret to the north of this turret be cleared (about 120m or so north of [3430, 7474]). At 60m+ north of [3430, 7474] it is possible to pull these enemies. They will not respawn while you are active on site.
Data collection was mostly done on this deactivated turret, except where otherwise noted in the guide. Work was done by testing a collected gun at point blank (0 m) range, then moving out until the damage changed. This change point was then measured against the coordinate grid to ensure a consistent X or Y alignment with the target (adjustments were made as necessary, and then the distance to the Falloff Range was verified and recorded). From here, I moved back a small amount until the damage changed again, and recorded again. In the earliest records, the X/Y calibration was checked consistently, until it was determined that after the falloff begins it changes every meter. After this, I would check and align for the exact Falloff Range, and then simply record every change in damage as I moved back to draw distance.
Each gun tested took about 20 minutes to record a full data set.
Data Harmonization & Deconstruction
Once sufficient data was collected, the data was changed from raw damage to a percentage of base damage. These percentage graphs were then sorted into groups of "like curves".
The "like curves" were then harmonized to account for inconsistencies in the data sets. Usually, these would appear as a "burr" in the line where it shouldn't be, and in all cases represented a gap in a data set (caused by me missing a measurement). These were resolved by simply moving the "burr" and all points following it one cell to the right. Once all the data plots for a falloff type were aligned, an "idealized curve" was reconstructed using the obvious nodal points.
In cases where the data set was insufficient to resolve inconsistencies, additional data was collected.
Data Validation
Once the "idealized curves" were constructed, they were rechecked against the live data (by applying the idealized curve against base damage of each weapon). The idealized curves were found to resolve within 1 damage point of the live data set (or, generally better than 99.95% accurate).
Back to Top
Changes:
Feb 20, 2015: Trick'd Out, a special pistol released as a farewell gift from creative lead Trick Dempsey has been tested and added.
Raw data: 11171, 11171, 11171, 11171, 11171, 11171, 11171, 11171, 11171, 11171, 11171, 11171, 11171, 10724, 10277, 9830, 9383, 8937, 8674, 8411, 8148, 7885, 7622, 7360, 7097, 6834, 6571, 6308, 6045, 5783, 5520, 5257, 4994, 4731, 4468, 4401, 4333, 4265, 4198, 4130, 4062, 3994, 3927, 3859, 3791, 3724, 3656, 3588, 3521, 3453, 3385, 3317, 3250, 3182, 3114, 3047, 2979, 2911, 2843, 2776, 2708, 2640, 2573, 2505, 2437, 2370, 2302, 2234, 2234, 2234, 2234, 2234, 2234, 2234, 2234, 2234, 2234, 2234, 2234, 2234, 2234
Acknowledgements:
I must acknowledge the following for their assistance with this project:
Keeper Riff, for being instrumental in establishing both the measurement system as well as suggesting the ideal test target;
Alexri, for his enthusiasm and support, and for providing the screenshots used in Appendix A;
Kierstin, for a very generous donation of a Legendary VBI HP-5 Wolverine to the project when I was having problems locking one down for data verification while the project was winding down;
Etaew, for programming assistance which allowed me to take the time necessary to craft this guide for you.
Zewy must also be acknowledged for providing the previous guide to falloff and ranges; this guide is linked again below.
Back to Top
Additional References:
http://forums.defiance.com/showthread.php?132212-Weapons-Range
http://forums.defiance.com/showthread.php?164768-Need-Help-with-a-Puzzle
http://forums.defiance.com/showthread.php?165142-Guide-Falloff-damage-in-practice-SMG-edition
Back to Top
APPENDICIES
Appendix A: General Compendium of Ranges
Jump Distance 5 m
Vertical Jump Distance 3 m
Roll Distance 6 m
Running Jump Distance 8 m
Default Reticle Height 1.75 m
Minimap Radius 100 m
Barrel Height 1 m
Small Metal Shipping Crate (VIM-0800 AOM) 2 m x 1 m x 1 m
Medium Wooden Shipping Crate 2 m x 2 m x 2 m
Medium Metal Shipping Crate (VIM AOM 1800) 2 m x 2 m x 3.25 m
Vendor Cart (excluding generator) 5 m x 3 m x 3 m
Vendor Cart (including generator) 7 m x 3 m x 3 m

Seascape Farms Ziggurat 36 m x 36 m
Back to Top
Comments
Contribute to the discussion or help improve an article by leaving a comment below.
Sign In to post a comment.
![]()
![]()
![]()
Wow, great guide, really well explained!
Its will serve me more, I am programing weapons on Unreal engine 3 for my game, its going to add to the realism... but going to have to remake my classes...
In any case it is good job, there's really lots of info!
10 years ago
![]() Stratotech Defiance 2050 [Source]
Stratotech Defiance 2050 [Source]
3PL9 WDFG DKPR 9LE7 P7Y7 [Redeem]